 |  |  | Image processing |
Image processing
In this project we will do a bit of image processing. You can find photos to experiment with by going to Flickr and searching for a useful keyword (for instance, search for KAIST to find photos of the KAIST campus). Or use photos from Facebook.Start by reading about working with bitmaps in Kotlin.
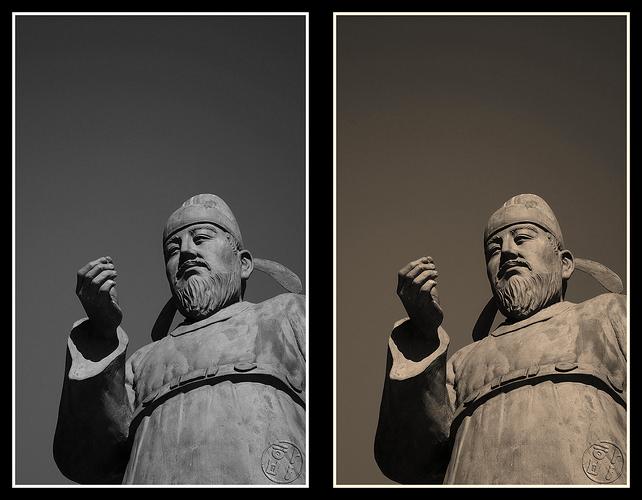
Sepia
Sepia is a color-toning technique that makes a photo look as if it was taken in the early twentieth century. Here is a comparison of black-and-white versus sepia versions of the same photo:
Write a function sepia that will convert a photo to sepia and returns a new image (the function does not modify the input image):
fun sepia(img: BufferedImage): BufferedImage {
  // ...
}
For each pixel of the photo,
- obtain the luminance using the formula
val v = (0.299 * red + 0.587 * green + 0.114 * blue).toInt()
- set red, green, and blue all to v
- if v is at most 62, increase red by a factor of 1.1 and decrease blue by a factor of 0.9
- if v is between 63 and 191, increase red by a factor of 1.15 and decrease blue by a factor of 0.85
- if v is at least 192, then increase red by a factor of 1.08, and decrease blue by a factor of 0.93. (If red becomes larger than 255, set it to 255)
- set the pixel to the new red, green, blue values.
Posterize
Posterizing means to replace the colors in a photo with a rather small set of colors (maybe ten). To posterize a photo, you first make a list of allowed colors. Then you look at every pixel of the photo, and replace it by the color from the list that is most similar. Write a function posterize that performs the second step:
fun posterize(img: BufferedImage, colors: List<Int>): BufferedImage {
 // ...
}
(Again, your function returns a new image and does not modify the
input image.)
To do this, you will need to measure the distance between two colors \((r_1, g_1, b_1)\) and \((r_2, g_2, b_2)\). The natural way to do this is to measure the distance like the (squared) Euclidean distance of three-dimensional vectors:
Write a function to compute the distance between two colors!
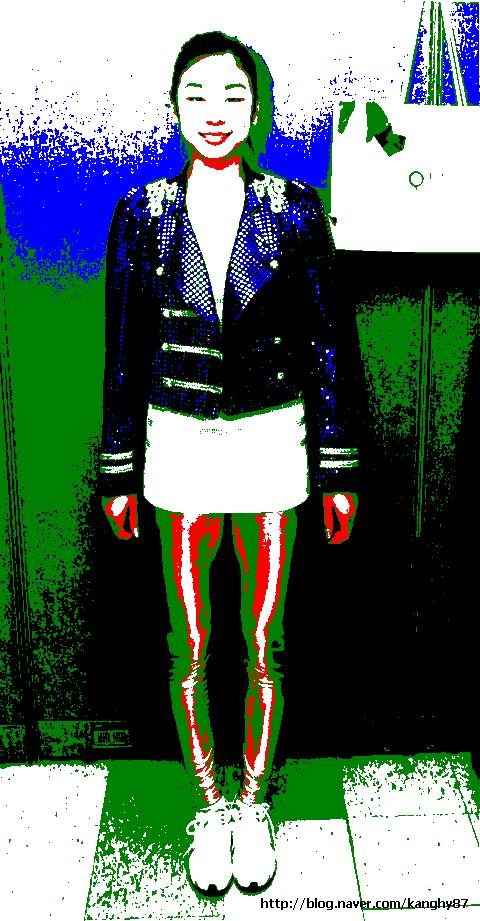
To test your function, you'll need to create a list of colors. Test first with a fixed list of colors like this:
val colorList = listOf(0xff0000, 0x00ff00, 0x0000ff, 0x000000, 0xffffff)
The result should like somewhat like this:
Then try other ways to select a color list. One possibility is to simple use a few random colors, for instance using this code:
val random = java.util.Random()

fun randomColor(): Int = random.nextInt(0x1000000)
Write a function that generates \(k\) random colors:
fun randomColors(k: Int): List<Int> {
  // ...
}
Here is what I got using 10 random colors (of course it will look different every time you run it):

Selecting colors
Let's now consider the problem of selecting colors that are adapted to the photo you want to posterize. Here is a method for doing this (\(k\) is the number of colors we want to choose):
- Create a set \(S\) of all the color values in the photo.
- Pick \(k\) random elements of \(S\), and call them \(c_1, c_2, \ldots, c_k\).
- For each element \(e\) of \(S\), find the closest color in the set \(\{c_1,\ldots,c_k\}\). Define sets \(S_1, S_2, \ldots, S_k\) as all follows: \(S_i\) contains all the elements \(e\) in \(S\) such that \(e\) is closer to \(c_i\) than to any \(c_j\), for \(j \neq i\).
- For each \(i\), replace \(c_i\) by the average value of the colors in \(S_i\).
- Repeat from Step 3. You can end the loop when the colors \(\{c_1, c_2,\ldots, c_k\}\) do not change in one iteration, or when you have reached a certain number of iterations (such as 10).
You can now use \(c_1, c_2, \ldots, c_k\) to posterize the photo. Write a function
fun selectColors(img: BufferedImage, k: Int): List<Int> {
  // ...
}
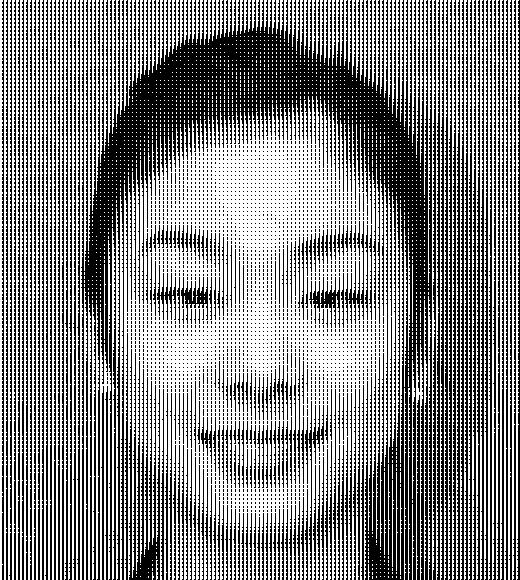
Printing photos
How do newspapers print photos? Ink is black, paper is white—there is no "gray ink". And still newspapers can print photos.
Can you create a version of a photo that only uses black and white pixels, and still creates the impression of gray levels?
One idea would be to represent each pixel of the photo using a small block of pixels. Depending on how many pixels in this block you turn black, you can achieve the impression of different gray levels.
Here is an example of how I implemented this.
| | | Image processing |